Showing posts with label Projects. Show all posts

Monday, July 29, 2013

Tassel Garland DIY


As much as I loved this tassel garland as a decoration for my daughters 1st birthday party, but I just could not bring myself to spend that much money on it at the time because I had so much else to deal with so of course I set out to try to replicate it somewhat with a few things at home and I think it came out pretty well. I had wanted to make a really long one but this ended up being good enough for the table we had at the party.

All you need to make this is:
  1. A few packs of good tissue paper in the colors of your choice.
  2. Washi tape ( or clear tape..)
  3. a roll of ribbon or string (I used a blush color)
  4. x-acto blade with new blade ( had tons in the basement from architecture school!)
  5. cutting mat  (had in the basement from architecture school!)
  6. pair of scissors
  7. metal ruler OR straight edge
And all you really have to do is put on some good music and have an hour or so to spare... and patience of course!

1. Take the sheet of tissue ( 20"x20") and fold in half, the start to cut into strips leaving an approximately 1.5" edge at the top ( at the fold) 
2. Try to keep the strips equal in size and straight.
3. Once you're done cutting, unfold and cut it into two halves
4. Take one of the halves and unfold it flat so you can see the seam in the middle ( approximately 3 inches)
5. Start folding in perpendicular to the cuts until you have a thin spine. ( also at this point you could twist instead to get it to really look like the one I referred to)
6. Foldover in the middle and drape over your ribbon ( I hung it up so I could easily hang the tassels as I made them)
7. At this point, you can use washi tape to close the neck, or clear tape and I've seen people use hot glue which is useful if you decide to twist the neck instead of fold (I try to stay away from hot glue guns unless its really the only option)
The only thing that bothers me about this is that you can see the folds from the prepacked tissues..I almost want to steam them out..OK not really..but you know what I mean.
I guess it didn't really look so bad in the end. Enjoy.


Wednesday, December 26, 2012

Holiday Cheer

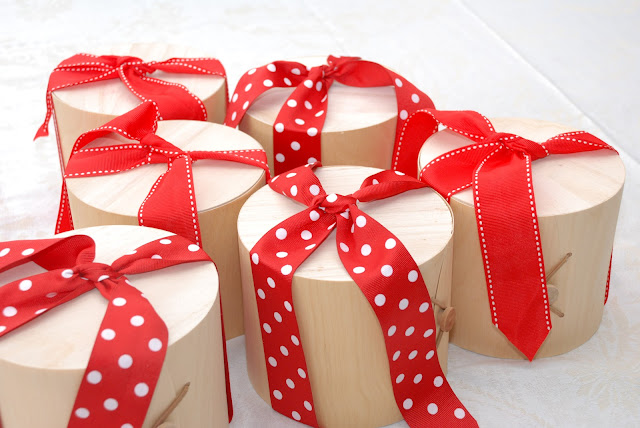
Since moving to our current home, we have joined in the tradition of holiday gift giving to the neighbors (some of which have become our friends) but last year I didn't give anything because I was tired and in a funk (and 3 months pregnant). This year, I decided to do the customary cookie gift but thought I would try to make it an elegant cookie gift. I fell for these birch wood boxes at Crate and Barrel and immediately ordered a few of them to hold the cookies. We spent half the day on Christmas eve making four kinds of cookies to put into theses gift boxes. After a few tries and some burning, tossing batter out and buying new ingredients, they came out quite well. Actually even after burning a few batches and some very flat chocolate cookies as well I was happy with the outcome and my baking skills. I had originally planned to make sugar cookies (easy) and Almond chocolate cookies (because I don't really fancy chocolate chip) but after four failed tries at the Almond chocolate, I got nervous. They were too chocolatey and melting into chewy pancakes in my oven. I realized after a few tries that I really needed more flour to give some substance and once I added an additional cup of flour they began to come out better.

As expected the sugar cookies came out great but I felt we had wasted so much of the chocolate batter that we wouldn't have enough cookies to fill the six boxes. Since I had way too many chocolate chips, I decided to add brown sugar chocolate chip cookies to the boxes, figured the kids would like them. As I was skimming through the Food Network 12 days of Cookies recipes, I saw a Shortbread recipe with 4 variations, one of which was the Chai tea shortbread and since I love Shortbread and I had tons of butter, I decided to attempt making them too. I have made shortbread before using a different recipe but they came out horribly but I really wanted to try again.
I actually think what really happened was I got so delirious I just couldn't stop myself from making more and more cookies...I lined the gift boxes with a Mara-mi specialty tissue I found which coincidentally had a red wood grain pattern printed on it, call me crazy but I thought it was very cool..wood box..wood grain tissue..get it?..No..ok!
Anyway, I was a bit surprised when I started putting them together, because I ended having more than enough cookies. All the chaos turned into what I really wanted which was a nice sampler of homemade cookies.
Don't get me wrong, it was fun but this isn't going to become an everyday occurrence because baking is a crazy sport..you can't become distracted for one minute or else something burns and you must be extremely precise while simultaneously being able to improvise and having enough knowledge about your ovens nuances to keep things under control. Between rotating the pan, watching for the slight browning of the edges to develop and taking them out immediately, you must be on top of it. One thing I found though was how inaccurate the cooking times were on the food network recipes, for example, I had to cut the cooking time in half for the brown sugar chocolate chip cooies because they kept burning! 


Tuesday, September 11, 2012

Petit Maison: Part 2

After assembling the shell of the house, I quickly sketched out a plan for the house and began to measure out the fenestration. I basically drew them in lightly in pencil for all three sides and then began to cut them out using the x-acto knife. Its important to change your blade after a few cuts because otherwise you will either end up with really messy cuts or loose a finger or both. 


The windows made a big difference to the house, it now looks much lighter and brighter. The next thing I did was to start to adhere colored card stock to the wood for walls to divide up the spaces and give some color to the house. Arielle loves pink and yellow so of course the house is going to be pink inside. We started with these sheets. Basically, once I decided where walls would go and cut them down to size, I glued the card stock to the wood with sobo glue and weighed them down for  a little while to make sure it was smooth and fully sealed, then I would cut out any openings in the walls. 

At this point, I was ready to start gluing the whole thing together, so I removed the tape and glued the exterior walls together and then glued them to the sides of the bottom floor. The I glued the interior walls to the both the floor and the exterior wall which gave the house some structure and rigidity.
I thought it was looking pretty good, but of course Arielle wants to know where all the furniture is and why its taking so long to do..I guess I could have just purchased the three story barbie house!


Friday, August 24, 2012

Petit Maison: Part I


Day 1: House after a few hours of prep and a trip to the craft store
I like the idea of making things, this is one of the things architects do all day, the work involved in actually designing, sketching, cutting and assembling an object from scratch is fun for me so I decided to make a small play house for Arielle. Initially, she really wanted one large enough for her and her cousins to hide out in but there isn't anyway I can do that so we decided to make one large enough for her dolls. I am not really interested in making a dollhouse in the traditional sense of the word and I certainly don't have the time to do so either but I can handle a simple design so thats what I sketched up; A simple two story house with a pitched roof. It is very hard for me to keep it simple and not go into real design mode, start sizing beams and calculation stair risers! 
   

Anyway, we started by going to the craft store to buy supplies. I decided to base the house on the largest piece of birch plywood I could find in the store which turned out to be 12"x24"x1/8". Here's what we bought: (2) -12"x24"x1/8" birch plywood, (10) -4"x24"x1/8" basswood, (4) -4"x24"x3/32" basswood and a mix of miscellaneous wood dowels. I also got out my X-acto knife, blades, Sobo glue, architectural scale, pencils, chopper, cutting mat and metal ruler. 


After a quick sketch to figure out what rooms we wanted, we started building.


Because the birch plywood is so hard, I used 1/8" basswood strips for the exterior walls laminated to museum board. The was good for two reason; it gave the wall thickness ( stability) and made it so that I could have a wood finish on one side and white on the other. Arielle enjoyed covering the entire 22x30" board with glue. We then laid each sheet of basswood carefully onto the board and piled magazines atop to keep it flat while it dried. We did this twice, one sheet for the front and back walls and then another for the long side wall.

While that was drying, I measured and cut 4 dowels to use as the edges for the floor slabs. I cut (4) 24" pieces and (4) 12" peices-less the thickness of the dowels. I then glues these onto the bottome of the (2) 12"x24"x1/8" birch plywood sheets and set those aside to dry.


Once the laminated wood and museum boards were dry, I drew out the profiles for the front and back sides and the side and began to cut them out using the x-acto knife and a metal ruler.


As I finished cutting them out I decided to try to assmeble the house to see if things fit together properly. Its important to do this before you glue anything together so you can adjust and trim where needed. If I was using a laser cutter, I wouldn't worry but because I am manually cutting this out by hand, I need to make things line up properly. I did this by basically using anything I could find to hold the walls up with and masking tape.


Two picture frames are holding up the second floor and I taped the walls together at the corners.


It took me a few hours to do all this only because I had a 3 year old helper and a 6 week old strapped to me in a Moby wrap but really its a quick process from start to finish. The next step will be to design and cut out the fenestration and interior walls.


After doing this, we took another trip to the craft store to get more board and pick out wall paper to decorate the house with. Arielle picked out this Dalmatian figure and the lady at the checkout forgot to ring it up until after I had paid up. I promised we'd be back to get it another time but a young lady behind us actually asked her to ring it up with her stuff and gave it to Arie...I had no idea people like this still existed..but it really made Aries day! So now we have a pet for our house.


Next Post: Fenestration and interior walls....